
Building Your Own DIY MFT/3-Style 20mm Workbench Table
The 20×96mm workbench standard popularized by Festool’s MFT/3 has become a go-to foundation in modern shops because it’s accurate, repeatable, and flexible. A precisely spaced grid of 20mm holes enables reliable crosscuts, consistent workpiece registration, and controlled routing, sanding, and finishing — often making the table the hub of the shop.
Commercial MFT/3-style tables are excellent, but building your own gives you two advantages you can’t easily buy: custom size and custom materials. Instead of being limited to standard dimensions, you can build the exact footprint your shop needs — longer for sheet goods, narrower for tight spaces, or sized to integrate with existing benches or cabinets. And you can choose materials based on your priorities, whether that’s portability, stiffness, mass, durability, or simply what you already have on hand.
This article complements Getting the Most From Your MFT/3 or 20mm DIY Table by focusing earlier in the process: planning and building an accurate worktop from scratch. The key tool is the Parf Guide System Mark II, a purpose-built system for creating a professional-grade 20mm hole pattern with confidence and repeatability — without CNC or complicated shop-made jigs.
What Makes the 20mm Worktop So Powerful
At first glance, a 20mm worktop is simply a flat surface with a grid of holes. In practice, its effectiveness depends entirely on how accurately that grid is executed across the entire surface.
The MFT/3-style layout is based on a 96mm-on-center grid, a spacing that enables fast, repeatable positioning of bench dogs, work stops, guide rails, and fixtures. When the holes are square, evenly spaced, and consistent in diameter, the table becomes a reliable reference for cutting, routing, sanding, and assembly — the basis of its “multi-function” role.
This is where many DIY tops fall short. Small errors in spacing or perpendicularity compound across the surface, leading to guide rails that won’t sit square, bench dogs that bind or rock, and setups that require constant adjustment. The result is a table that looks like an MFT-style top but never fully delivers.
A properly executed 20mm worktop, by contrast, becomes a true system component. Dogs register cleanly, rails align predictably, and stops can be removed and reinstalled with confidence. Accuracy isn’t something that can be added later — it’s built into the table from the first hole and determines how well every accessory will perform over time.
Planning Your Worktop Before You Cut Anything
Before drilling a single hole, it’s worth thinking through the decisions that will shape how your table works in daily use. While MFT/3-style tables are extremely adaptable, the most successful builds are planned around real workflows while anticipating future needs. A bit of forethought here can prevent compromises later.
Q1. What’s the right table size for your work?
One of the biggest advantages of building your own table is freedom from fixed dimensions. Instead of adapting your workflow to a standard size, you can design the table around how you actually work.
Larger tables can make sense for breaking down sheet goods, while smaller or narrower tops may be a better fit in compact shops. Finished height matters too. A lower table can be more comfortable for track saw work, while matching the height of adjacent benches or machines can simplify material handling. There’s no single correct size — the key is deciding up front, since table size influences everything from the base to the hole layout.
Q2. Where will your table be located?
Location is just as important as size. Adequate clearance on all sides makes clamping, cutting, and assembly easier. Centrally located tables tend to offer the most flexibility, while wall placement can work well for specific workflows.
Consider infeed and outfeed paths for large panels, and don’t overlook power. Routers, sanders, track saws, and dust extractors all require reliable wall power, and most shops still rely heavily on corded tools. Planning outlet access or power drops up front can significantly improve usability.
Q3. What accessories will you use?
Most MFT/3-style tables quickly evolve beyond “just a table.” Guide rail hinges or mounting dogs, fences, and stops all add capability — and some require space above or around the worktop.
Setback behind the table and vertical clearance above it are especially important for articulating or flip-up guide rail systems. Thinking ahead to future accessories helps ensure the table doesn’t outgrow its location.
Q4. How will you support the table?
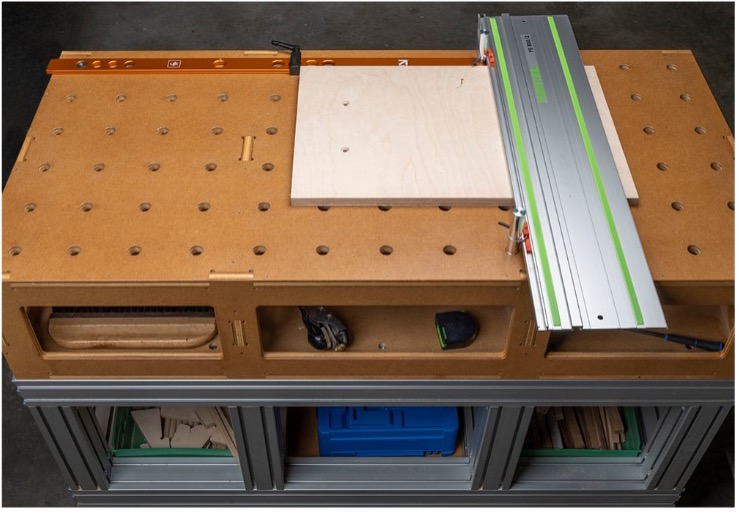 Figure 1. While this already-built aluminum extrusion table was too low to the ground for practical woodworking, adding a Paulk-style top lifted it to the just-right finished height.
 The worktop may be the focal point, but the base plays a major role in how the table functions. Some builders create dedicated cabinets with Systainer storage, while others place the top on an existing cabinet, toolbox, or mobile base. The space below the table is often ideal for a dust extractor.
You don’t have to commit to a base immediately. Some designs, like the Stanton Bench, are intended to sit on an existing countertop, while Paulk-style benches use compact sawhorses that mount directly to the top for portability. This flexibility allows you to start using the table sooner and refine the support over time.
With these decisions made, you’re well positioned to choose a construction style that supports the way you actually work.
Portability, Mass, & Modularity
Once size, location, and support are defined, the next decision is how permanent (or how flexible) you want the table to be. The right balance between portability, mass, and modularity depends on the work you do and how your shop is used.
Lightweight, knock-down designs such as Paulk-style benches prioritize portability and fast setup. They’re well suited to small shops, shared spaces, or remote/jobsite use, and when paired with an accurate 20mm top can still deliver excellent cutting, routing, and assembly performance.
Heavier, more permanent tables offer different advantages. Added mass improves stability and vibration damping, which can be beneficial for hand planing, routing, and working with larger stock. A heavier base often feels more planted and confidence-inspiring, and prevents the racking typical of lighter weight MFT/3 tables.
 Figure 2. Power-Loc Dogs using to affix a bench grinder rigidly to the 20mm worktop. This was essential because the vibration of the grinder would cause it to “walk” off the table in short order.
 These approaches aren’t mutually exclusive. Many effective MFT/3-style setups are modular. Using bench connecting dogs such as Smart Connect or Power-Loc Dogs, multiple tables or work surfaces can be joined when needed and separated when they’re not. A compact primary table can handle most daily tasks, with auxiliary surfaces added only when required.
The takeaway is that an MFT/3-style 20mm worktop doesn’t have to be a single, fixed solution. With thoughtful planning and the right connecting hardware, it can be part of a modular system that adapts as your projects and workflows evolve.
Introducing the Parf Guide System Mark II
No matter how well a table is planned, its performance ultimately depends on the accuracy of the 20mm hole pattern. Creating a large, perfectly spaced, dead-square grid by hand is difficult to do consistently and accurately across a full-size worktop. And this is where many DIY builds fall short.
The Parf Guide System Mark II was developed specifically to solve this problem. It’s a precision-engineered system designed to produce MFT/3-style 20mm worktops with a level of accuracy and repeatability that traditionally required CNC equipment.
Instead of relying on layout lines or small templates that introduce cumulative error, the system establishes a precise geometric reference using long Parf Sticks and accurately positioned registration pins. Each hole is indexed from this reference, keeping the 96mm grid true across the entire surface.
This makes the Parf Guide System especially well-suited to DIY woodworkers. The same process delivers consistent results on both compact portable tops and large stationary benches, and it requires only a drill to use. Once the worktop is complete, the system stores away compactly, ready for future projects or expansions.
Key Features of Parf Guide System Mark II
The Parf Guide System Mark II is designed to remove guesswork and prevent cumulative error when creating large 20mm hole patterns. Every component is focused on maintaining accuracy across the entire worktop — not just the first few holes.
At the core of the system are precision-milled Parf Sticks and drilling sleeves. These hardened components establish exact spacing and alignment, allowing each hole to be indexed from a known accurate reference rather than from layout marks. This approach eliminates one of the most common problems in DIY builds: accumulated measurement error.
The system produces the standard 96mm grid used by MFT/3-style tables, keeping hole spacing square and consistent as the pattern grows. As a result, bench dogs, work stops, guide rails, and workpieces register accurately anywhere on the surface.
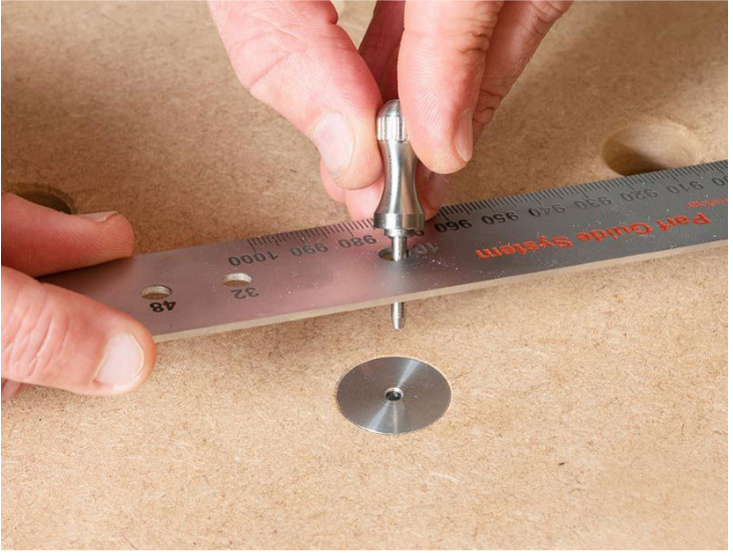 Figure 3. Parf Revision Dogs allow you to extend 20x96mm hole patterns at any point in the future.
 The Parf Guide System also scales easily. Parf Revision Dogs can be used to extend an existing hole pattern accurately, making the system a good fit to modular tables and evolving shop layouts.
A specialized 20mm Parf Cutting Forstner bit is included, producing fast,
clean, precisely sized holes with minimal tear-out. Consistent hole diameter is critical for reliable workholding, and this cutter plays a key role in achieving it.
Together, these features allow the Parf Guide System Mark II to deliver professional-level results using tools most woodworkers already own, creating a worktop that performs predictably and inspires confidence.
Why Not Just Use a CNC?
Unlike CNC-based solutions, the Parf Guide System doesn’t require specialized machinery, software, or a dedicated setup. It fits easily into a typical shop, uses tools most woodworkers already own, and stores away compactly when the worktop is complete.
The system also provides flexibility, whereas typically CNC-cut tops don’t. You’re not required to drill the entire surface at once. Areas can be left solid for guide rail travel, assembly, or finishing, with additional holes added later at the same level of accuracy.
This incremental approach is difficult to achieve with CNC methods, which usually require committing to the entire hole pattern in a single operation. With the Parf Guide System, the worktop can evolve over time — matching the way most shops and workflows actually grow.
Chamfering the 20mm Holes
Drilling accurate 20mm holes is only part of creating a fully capable MFT/3-style worktop. To unlock the full range of modern 20mm accessories, those holes must be properly chamfered.
Chamfering is done as a finishing step using th e UJK Combined Reamer and Chamfer Tool, not with the Parf Guide System itself. After drilling, this tool adds the correct chamfer to the top edge of each hole, preparing the worktop for chamfered 20mm accessories.
The benefits are significant. Chamfered bench dogs self-center in the hole for improved precision, bulky collars above the surface are eliminated, and eased edges on the work surface reduce the chance of catching or pinching fingers. A chamfered worktop is simply more pleasing to use.
 Figure 4. Chamfer and ream in one operation with this special tool
 Once chamfered, the worktop becomes compatible with an even wider range of accessories, including 20mm Chamfer Dogs, the Parf Super Dog, Expanding Dogs, and advanced work stops such as the TDS-13 and Ultra Low Profile Bench Stops.
Reaming is also an important long-term maintenance step. Changes in shop humidity can cause sheet goods to swell over time, making bench dogs fit tightly. The reaming function of the same tool allows holes to be restored to their original size whenever needed, helping ensure consistent performance over the life of the worktop.
The Perfect Foundation for Expanding Capability
A precisely drilled and chamfered 20mm worktop becomes more than a flat surface… It becomes the foundation of an expandable workholding system.
Bench dogs provide fast, repeatable referencing for cutting and assembly, while specialty options such as UJK Adjustable Height Guide Rail Dogs allow guide rails to be positioned accurately and consistently. Work stops extend this capability further, supporting repeatable cuts, controlled routing, and reliable part positioning.
Accessories like TSO Low Profile Dog Stops, the TDS-10, and the TDS-13 depend entirely on the accuracy of the hole pattern beneath them. When the grid is correct, these tools perform exactly as intended — quickly and predictably, without constant adjustment.
This is where care at the build stage pays off. Setups become faster, accessories become more effective, and the table shifts from something you work around to something you rely on and trust instinctively.
Final Thoughts: Built Once, Built Right
Building your own MFT/3-style 20mm workbench table allows you to create a surface that fits your shop, your workflow, and the way you work. With thoughtful planning and an accurate fabrication method, you can avoid compromises and create a table that performs for years.
The Parf Guide System Mark II makes that level of precision achievable in a typical woodworking shop. It supports a wide range of table designs, accommodates future growth, and delivers repeatable results without specialized machinery.
Whether you’re building your first 20mm table or refining an MFT-based workflow, starting with an accurate worktop sets everything else up for success. Build it once. Build it right.
Recent Posts
-

How to Use a Wood Router for Clean, Controlled Cuts
A wood router is one of the most versatile tools in any woodworking shop. It edges, joints, shapes, …6th Mar 2026 -

Woodworking Jigs That Improve Accuracy and Repeatability
Every experienced woodworker reaches a point where freehand work and careful measuring hit a ceiling …3rd Mar 2026 -

Festool Domino Accessories: Why the BigFoot Base System Is Worth a Look
The Festool Domino handles edge mortising well out of the box. Face mortising is a different story. …24th Feb 2026