
Rip Cut vs Crosscut: What Every Woodworker Should Know
You're halfway through cutting a board when the blade binds, the wood splinters, or worse—you experience kickback. More often than not, the culprit isn't user error or faulty equipment, it's using the wrong cutting approach for the grain direction.
Understanding the difference between rip cuts and crosscuts isn't just woodworking theory, it's the foundation of safe, efficient work that produces clean results every time. Whether you're dimensioning lumber for a cabinet project or breaking down sheet goods, knowing when and how to make each type of cut will save you time, material, and potentially prevent injury.
The distinction comes down to one critical factor: grain direction. Master this concept, and you'll work faster, safer, and with better results.
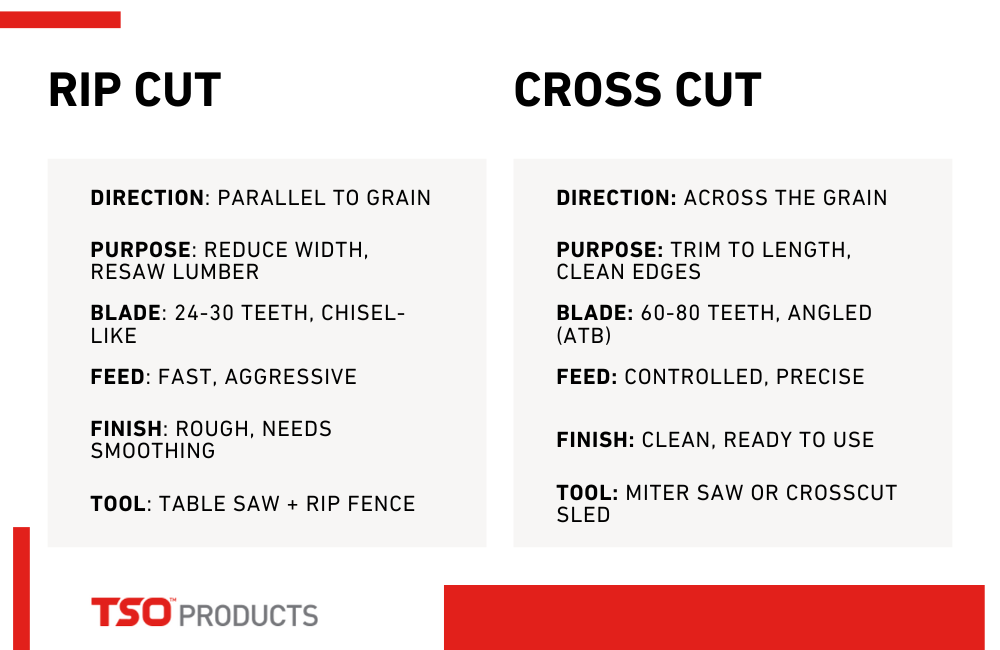
Definitions & Fundamental Differences
Rip Cut:
A cut made parallel to the wood grain. Think of it as following the natural fiber direction of the wood. Rip cuts are typically used to reduce board width, resaw thick stock, or break down lumber to rough dimensions. These cuts are naturally aggressive, the blade is working with the grain structure, allowing for faster feed rates. However, this aggressive nature means rip cuts often leave a rougher surface that may require additional smoothing.
Crosscut:
A cut made across the wood grain, perpendicular to the fiber direction. Crosscuts are most commonly used to trim boards to length, cut joinery like dados that run across the grain, or create clean edges for glue-ups. Because you're severing wood fibers rather than following them, crosscuts require more precision and typically produce cleaner edges straight from the saw.
Here's the crucial point many woodworkers overlook: the distinction is based entirely on grain direction, not the orientation of your board on the saw. A 2×10 ripped lengthwise is still a rip cut, even though you're cutting along the long dimension. Conversely, cutting a 1×12 to length is a crosscut, regardless of which saw you use.
This grain-based definition matters because wood behaves differently depending on how you approach the fibers. Rip cuts tend to self-feed as the blade follows the grain, while crosscuts require controlled pressure to slice cleanly through fibers without tear-out. Understanding this behavior is essential for choosing the right blade, setting appropriate feed rates, and maintaining control throughout the cut.
 Saw Blade Geometry & Tooth Design
The difference between rip and crosscut blades isn't marketing…it's engineering based on how wood fibers behave under cutting forces.
Rip blades feature fewer teeth (typically 24-30 on a 10" blade) with large, square-ground profiles that act like tiny chisels. These aggressive teeth are designed to chip away material as they follow the grain, creating the rough gullets needed to clear the substantial waste generated during ripping. The deep gullets between teeth provide ample chip clearance, preventing binding that could cause dangerous kickback.
Crosscut blades take the opposite approach with 60-80 smaller teeth that feature alternating top bevels (ATB). These angled teeth slice through wood fibers like tiny knives rather than chipping them away. The higher tooth count creates a smoother cut surface but removes material more slowly. The smaller gullets work fine here because crosscuts produce finer sawdust rather than chunky chips.
Combination blades attempt to split the difference with 40-50 teeth in groups of alternating tooth geometries, typically four ATB teeth followed by one flat-top raker tooth. While versatile for shops that can't justify multiple blades, combination blades compromise both ripping speed and crosscut quality. They're adequate for general work but won't match the performance of dedicated blades for demanding cuts.
The takeaway: blade geometry directly impacts both cut quality and safety. Using a crosscut blade for ripping will bog down your saw and increase kickback risk, while rip blades will produce unacceptable tear-out on crosscuts.
Tools & Cutting Methods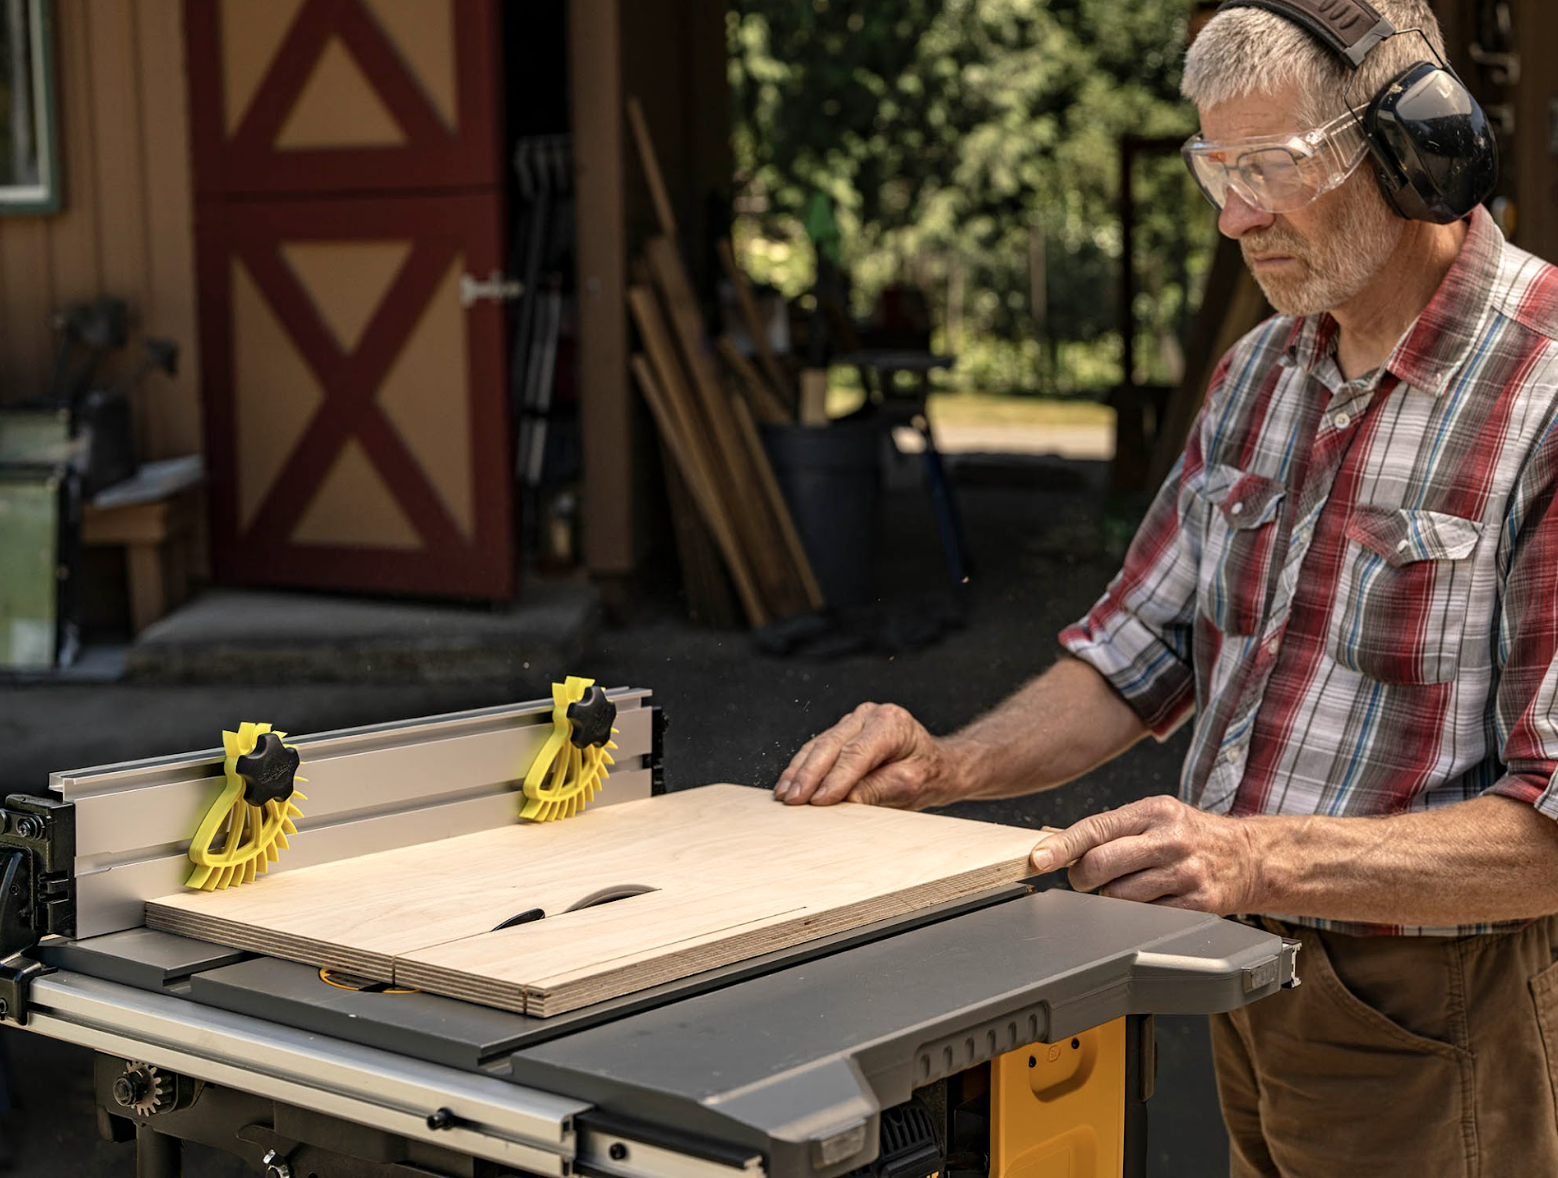
Your choice of cutting method should align with both grain direction and the precision requirements of your project.
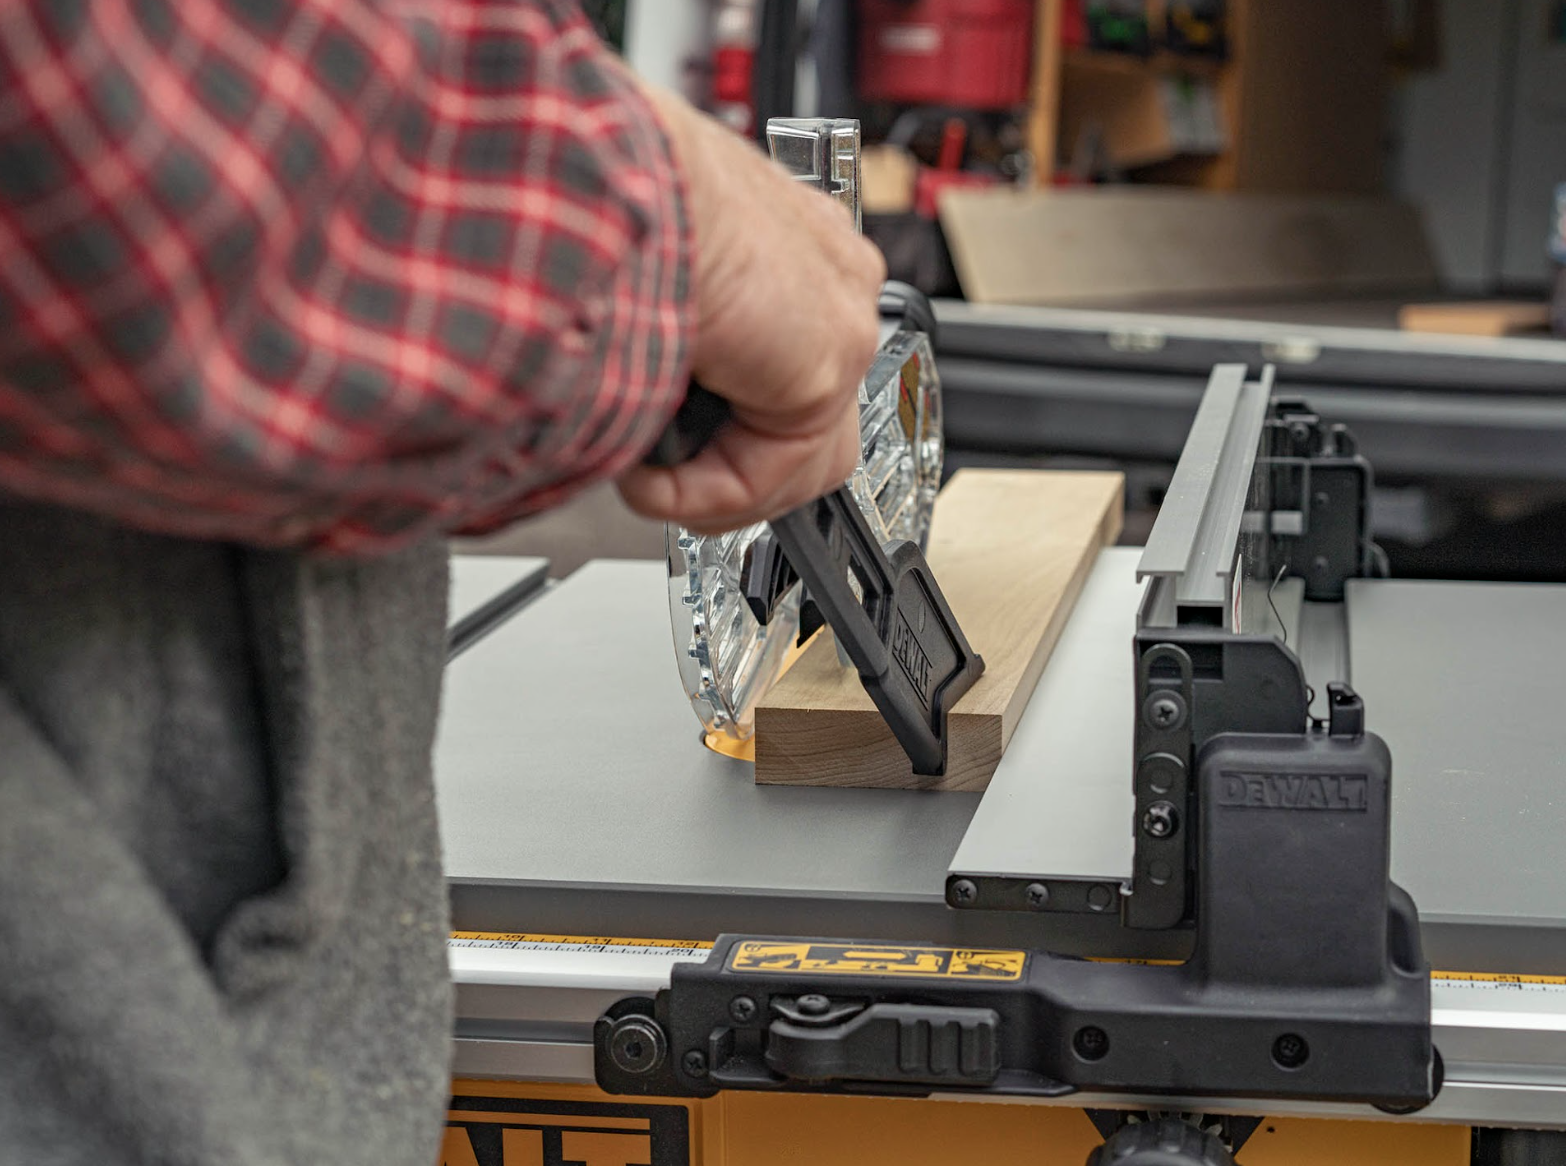
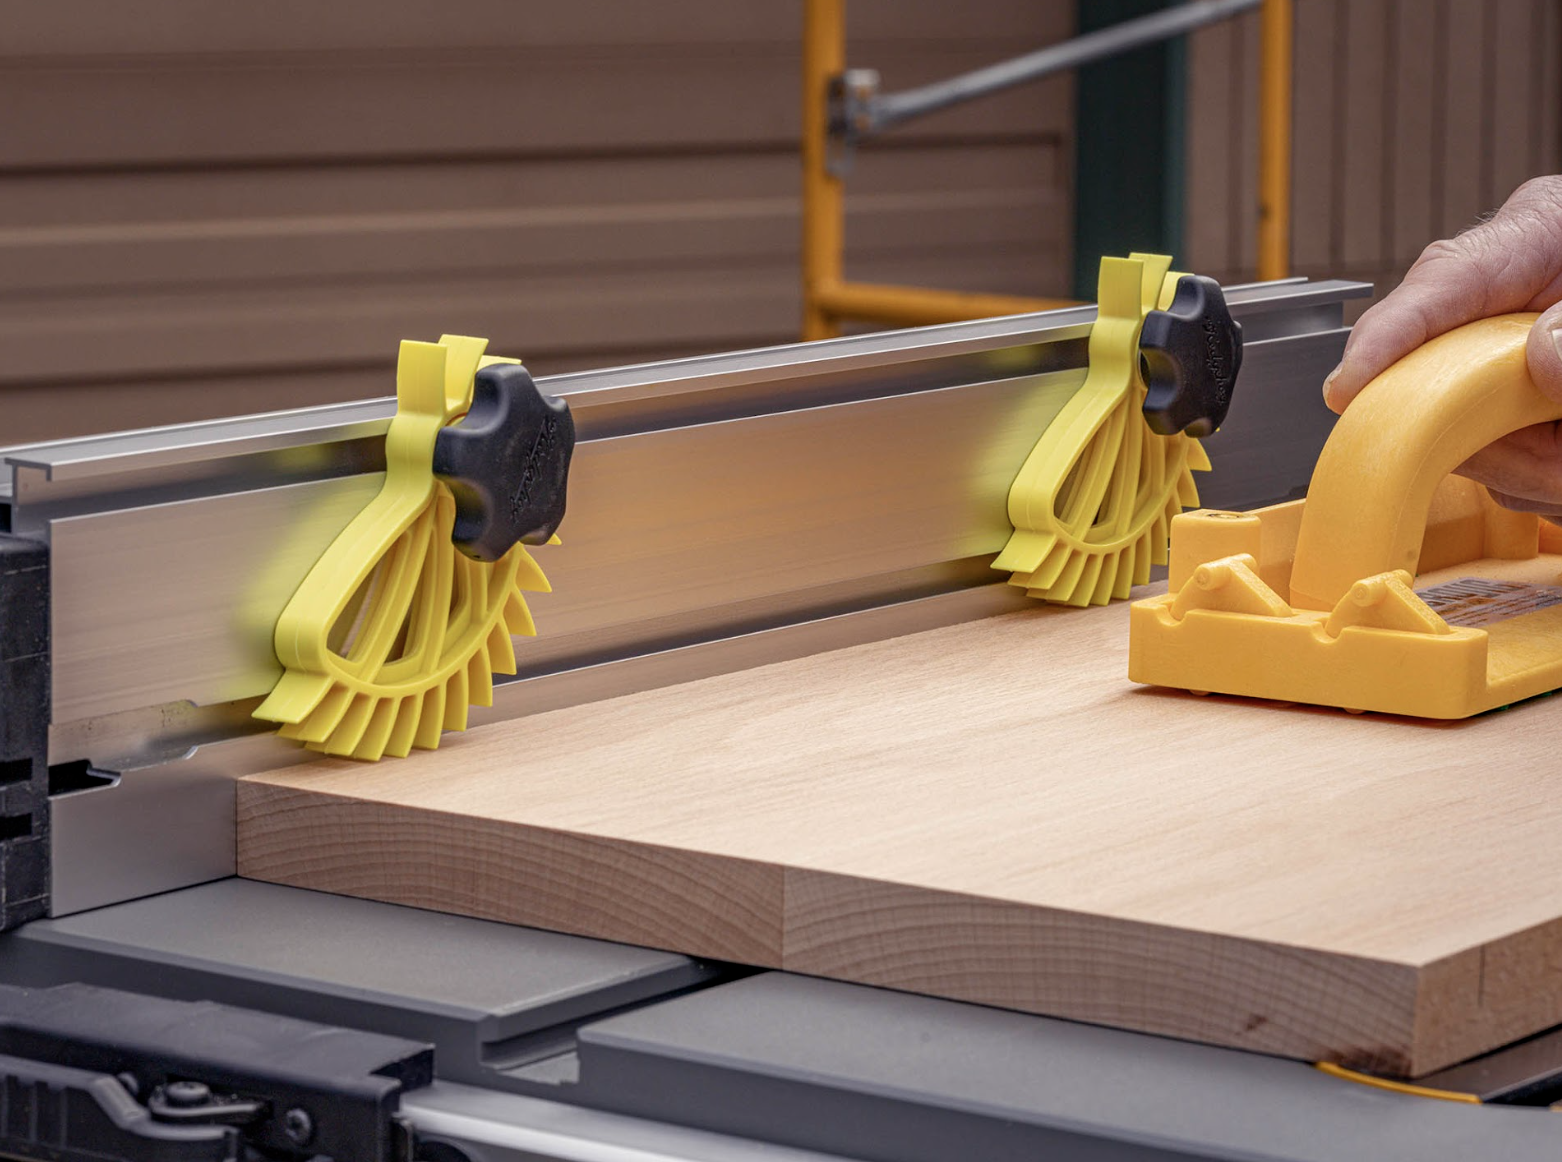
Table saws with rip fences are the standard for rip cuts. The fence provides consistent parallel guidance while the blade's geometry and your saw's power handle the aggressive material removal. For wider boards, supporting the outfeed prevents binding as the cut progresses.
Miter saws and crosscut sleds excel at crosscuts where accuracy and clean edges matter most. Miter saws provide built-in workpiece support and precise angle control, while table saw sleds offer better control for wider panels and eliminate the risk of blade deflection that can occur with miter gauges.
Here's a critical safety point: don't use crosscut-centric tools for ripping operations. Attempting to rip long boards on a miter saw is both inefficient and dangerous; you're fighting the tool's design and compromising control. Similarly, using a miter gauge for ripping creates unstable workpiece support and increases kickback potential.
The best approach matches your tool selection to the cut type from the start. This isn't just about efficiency, it's about maintaining the control and predictability that keep you safe in the shop.
Project Considerations & Practical Applications
Understanding when to rip versus crosscut shapes your entire workflow and material preparation strategy.
Rip cuts dominate the early stages of most projects: breaking down lumber to rough width, resawing thick boards into thinner stock, or creating strips for laminated assemblies. These cuts prioritize speed and material removal over surface finish. You'll typically plane or sand ripped surfaces anyway. When processing multiple boards to the same width, ripping lets you work quickly through material preparation.
Crosscuts become critical when precision matters: trimming components to final length, cutting joints that must fit exactly, or creating edges that will be visible in the finished piece. The clean surface from a proper crosscut often eliminates secondary operations, saving time despite the slower cutting speed.
Your blade choice directly impacts efficiency:
- Rip blades allow faster feed rates and reduce strain on your saw's motor when working with grain
- Crosscut blades deliver surfaces ready for glue-up or assembly without additional smoothing
- Combination blades work for shops doing mixed operations but require patience—they'll rip more slowly than dedicated rip blades and may still need touch-up on critical crosscuts
Consider your project's requirements upfront. If you're dimensioning lumber for painted cabinets, rip blade efficiency might matter more than surface quality. For furniture with exposed edges, the time invested in proper crosscuts pays dividends in the finished appearance.
Quality, Speed & Safety Trade-offs
Every cutting decision involves balancing three factors: surface quality, cutting speed, and operational safety. Understanding these relationships helps you choose the right approach for each situation.
Rip cuts naturally want to move fast—the blade geometry and grain direction create a self-feeding action that can quickly get away from you. Feed too aggressively, and you'll overload the motor, cause blade deflection, or create the binding conditions that lead to kickback. Feed too slowly, and you'll burn the wood while dulling your blade. The sweet spot varies with species, moisture content, and blade sharpness, but experienced woodworkers develop a feel for the right pace.
Crosscuts demand more controlled feeding. Rush a crosscut, and you'll get tear-out on the exit side or, with harder woods, blade deflection that compromises accuracy. The payoff for patience is edges clean enough for immediate use, no planing or sanding required.
Blade maintenance amplifies these relationships. A sharp rip blade cuts aggressively with minimal feed pressure, while a dull one requires dangerous force and produces burned, rough surfaces. Sharp crosscut blades slice cleanly with light pressure; dull ones tear fibers and leave fuzzy edges regardless of feed rate.
The safety implications are real: most table saw accidents occur when operators apply excessive force to compensate for dull blades or inappropriate blade selection. Respecting these trade-offs keeps you both safe and productive.
Better Cuts Start With Better Setup
The difference between rip cuts and crosscuts goes far beyond academic definitions, it's about working with wood's natural properties rather than against them. Choose your blade and cutting method based on grain direction, not convenience or the tool that happens to be set up.
TSO Products offers accessories that make these distinctions practical in your shop—from precision fences that ensure straight rips to featherboards that maintain consistent pressure for both cut types. When your setup supports proper technique, you can focus on the craft instead of fighting your tools.
Ready to upgrade your cutting accuracy and safety? Explore TSO's workstation components and cutting accessories designed to help woodworkers achieve professional results with confidence.
Recent Posts
-

How to Use a Wood Router for Clean, Controlled Cuts
A wood router is one of the most versatile tools in any woodworking shop. It edges, joints, shapes, …6th Mar 2026 -

Woodworking Jigs That Improve Accuracy and Repeatability
Every experienced woodworker reaches a point where freehand work and careful measuring hit a ceiling …3rd Mar 2026 -

Festool Domino Accessories: Why the BigFoot Base System Is Worth a Look
The Festool Domino handles edge mortising well out of the box. Face mortising is a different story. …24th Feb 2026