How To Build a TSO Parallel Guide System
We designed the TSO Parallel Guide System to be modular. Rather than all-in-one kits, we wanted to give woodworkers the flexibility to build the perfect kit to match their specific needs. While this process takes a bit more time, you’ll get the right kit for you—and avoid paying for extraneous components you’ll never use. In this article, we will discuss how to build a TSO Parallel Guide System with questions you need answered and the pros and cons to consider along the way.
There are three questions you need to answer to build your TPG kit:
- Do you have a compatible track saw system?
- What is the maximum rip capacity you need?
- What guide rail connection method will you use?
Question 1: Track Saw Compatibility
Currently, the TSO Parallel Guide System is compatible with track saw systems from Festool, Makita, DeWalt, Milwaukee, Rigid, and Kreg’s Adaptive Cutting System (ACS). It also fits on Powertec brand guide rails (specifically, those designed for Festool and Makita track saws).
Question 2: Maximum Rip Capacity
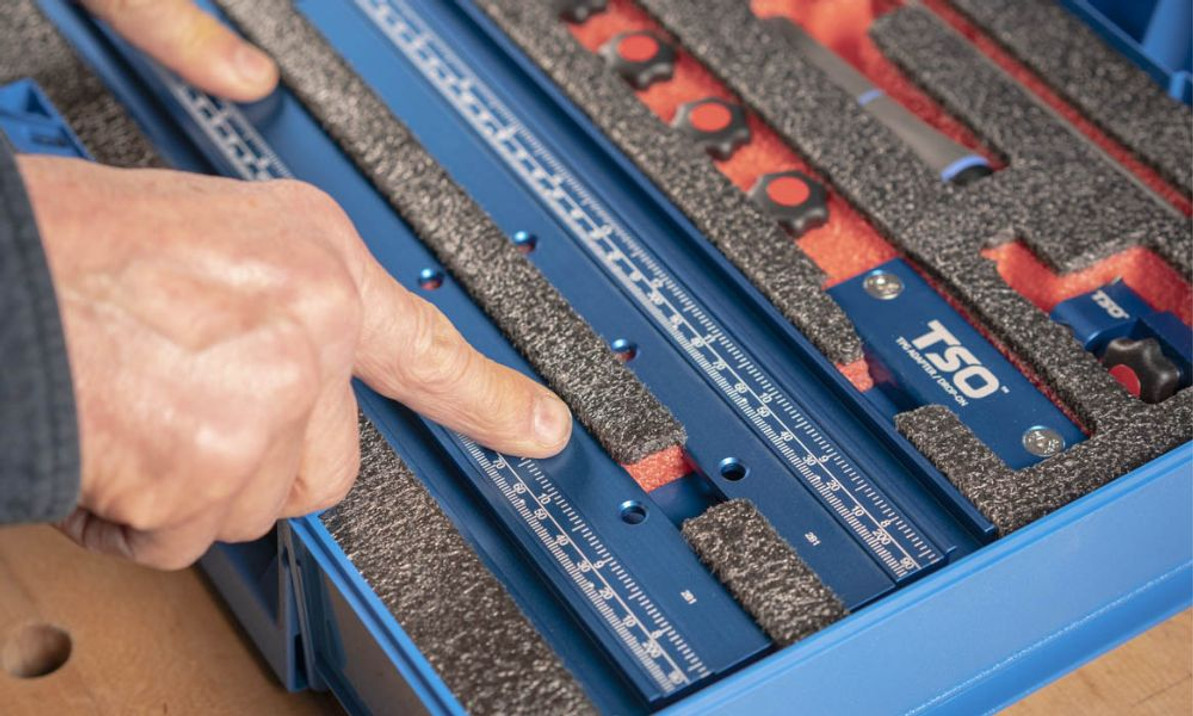
The TPG System comes with three different lengths of parallel guide T-tracks: 20", 30", and 50" lengths. Note that these lengths denote the maximum rip width capacity you can achieve once attached to the guide rail, not the physical length of the parallel guide. (Remember, because parallel guides attach to the left side of your guide rail, you need to add approximately 8" to the length of the parallel guide to get the maximum rip width achievable with each length of T-track.)
Deciding on the length of parallel guide T-track really comes down to the type of woodworking you do. If you’re frequently cutting full sheets of plywood (4x8 feet), you’ll likely want the ability to rip to the full 48" width of the sheet. If you’re doing standard cabinetry where casework typically only measures 12" to 24" deep, you will likely find the 20" or 30" T-tracks to be sufficient for most of your work. If you mostly build smaller, more intricate projects like jewelry boxes, or if you value maximum portability, 20" T-tracks might be just what you need—and the entire kit is small enough to fit into a single Systainer.
Whatever decision you make, know that you can always add to your TPG kit in the future. For example, if you select the TPG-30/50 Set (which does not include 20" T-tracks) and later determine that most of your work only requires 20" of rip capacity, you can always order the standalone 20" T-tracks in the future.
If you find the frequent need to make cuts beyond the maximum rip capacity of your longest T-track, we offer a T-Track Connector enabling you to daisy-chain multiple tracks together. This is a great option for those who need ultra-wide cutting capacity or those who only occasionally require wider rips beyond the capacity of their T-tracks. However, this connector does come with some limitations inherent to the design of the TPG System. Because each T-track includes laser-engraved Imperial and Metric dimensions, once combined, the measuring scale on the furthest T-track will no longer correspond to the total cut length; you’ll have to do a little math to add the length of the nearby T-track to your measurement total.
At the end of the day, select the maximum rip capacity that corresponds to most of the work you do. In the case of the occasional exception, you can always add standalone T-tracks later or opt for a T-track Connector.
Question 3: Guide Rail Connection Method
When building TSO’s Parallel Guide System, you’ll realize that it’s unique because it offers two primary methods to connect the parallel guide to your guide rail:
- TPG Adapters
- GRS-16 Guide Rail Squares
Connecting With TPG Adapters
Built specifically for our parallel guide system, TPG Adapters represent the most economical method of guide rail attachment. They are available in two flavors: Slide-In and Drop-On. Note the Drop-On TPG Adapter is only compatible with Festool and Kreg guide rails, while the Slide-On TPG Adapter is compatible with Festool, Makita, Milwaukee, Kreg, Rigid, and Powertec guide rails.
If you own a Festool or Kreg track saw, the Drop-On TPG Adapter is a great choice as it adds a tool-free and quicker means to attach and remove parallel guides. When placed on your guide rail, the Drop-On TPG Adapter can be fine-tuned by adjusting the two “zero clearance adjustment” screws to eliminate unwanted play; this procedure only has to be performed during first use.
When you need a more permanent attachment, secure the Drop-On TPG Adapter to your guide rail with the included torpedo nut and top-mounted M5 flathead screws, just like the Slide-On TPG Adapter. To see the Drop-On TPG Adapter in action, see how Hans demonstrates it and compares both styles. Always use TPG Adapters in pairs and use the GRS-16 connection method outlined below with just a single parallel guide T-track.
Pros:
- The most economical guide rail attachment method
- Two different options (Slide-On or Drop-On)
Cons:
- Always use in pairs
- The Drop-On TPG Adapter is only compatible with Festool and Kreg guide rails
Connecting With GRS-16 Guide Rail Squares
If you already own a GRS-16 Guide Rail Square or want to add even more functionality to your TPG System, consider this connection method. While the GRS-16 is more expensive than TPG Adapters, it enables the patent-pending ability to square and parallel in a single cut, using just one T-track. The GRS-16 Guide Rail Square provides rigid attachment to your guide rail, and its M6 accessory threaded holes permit easy attachment of the TPG T-track using two comfort-grip star knobs.
While both the GRS-16 and GRS-16 PE can serve as guide rail connection methods, keep in mind the GRS-16 only includes one reference edge along its top. This means you can only use the GRS-16 to connect the near-side (or left-hand) parallel guide to begin your cut. On the other hand, the GRS-16 PE has two reference edges along its top and bottom, so it can connect either parallel guide, referencing the front or back edge of your workpiece, at the beginning or end of your cut.
The main advantage of using a GRS-16 with the TPG System is that you can ensure squareness and parallelism of your cut using just a single TPG T-track. This is a great option if you’re typically making shorter rips or want an ultra-portable solution. For rips longer than 30" in length, we recommend attaching a second parallel guide to the far end of the cut to ensure perfect parallelism.
Pros:
- Save money: if you already own a GRS-16 Guide Rail Square, there’s no need to purchase additional connectors
- Square and parallel in a single cut, using just one T-track
Cons:
- More expensive than TPG Adapters
Still Have Questions About Building Your TPG Kit?
We’re always happy to help. You can contact us at info@tsoproducts.com or phone us toll-free at 866-678-7621, Monday through Friday, 8 a.m. to 3 p.m. Central Time.

Recent Posts
-
Building Your Own DIY MFT/3-Style 20mm Workbench Table
The 20×96mm workbench standard popularized by Festool’s MFT/3 has become a go-to foundation in moder …27th Jan 2026 -
JessEm Stock Guides for DeWalt Table Saws: Precision & Consistency
JessEm Stock Guides give you consistent hold-down pressure, one-way feed control, and include a slig …19th Dec 2025 -
What Size Guide Rail Do I Need? Choosing the Right Length (and When to Use Extensions)
The scenario: you need to make a cut in that full size plywood panel sitting in the corner of your s …6th Nov 2025


